Pages

Sunday, November 3, 2013

Suncatcher... window/wall art


I'm always on the look out for open-ended fun art activities that my kids and I can create. I am also always looking out for homemade crafts that would make a great gift for friends and family. It's lovely when children can make their own extra special present for someone they love. Often what I find is activities suited mostly for older children or ones that are very parent directed, fiddly, and don't allow much room for self expression and creativity.

So I had a look around and with a mix of others ideas, I came up with this little 'gem'!


 What you need:
-transparent plastic sheet
-embroidery hoop (this one is 22cm)
-coloured gems, jewels, glitter glue
-pva glue


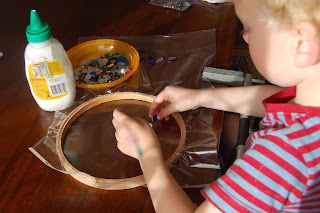
Cut the A4 plastic sheet and open it out so it becomes A3 size.  Fit the embroidery hoop tightly around the plastic sheet. 

Now it's time for FUN!


Sparkly gems: I made the mistake of buying silver backed gems. It's great for the wall as they reflect the sun but if you want to put it on the window, not so good. Buy the transparent ones for window art. You might like to demonstrate some ideas here for patterning to your small person or just let them do their own thing.

 Let them go pretty crazy with the glue. They often love this part the most! 


 Once finished let it dry over night. Then trim the excess plastic off.

Add ribbon to the top and it would make a great Christmas decoration. You could also make lots of smaller ones to hang on the tree. You could also paint the hoop for a different effect. To hang on the window, just use blue tac, it is light enough to hold well. Enjoy! 

Tuesday, September 24, 2013

Melted bead fairy/wizard wand


Mr J has been turning his little sister and parents 'into a frog' with his teddy bear pencil. So today I thought this little wizard full of magic tricks deserves something better to cast his spells with. I found myself searching through the amazing http://www.artfulparent.com site and as usual found something brilliant.

So here goes, magic melted bead fairy/ wizard wands. First we gathered some lovely plastic beads, a mixed of transparent and opaque. Then we placed them inside fun shaped metal biscuit cutters on a tray covered with alfoil. I used the sandwich maker, outside, to melt the beads ( I was a bit concerned about the fumes).


I shifted the alfoil with cutters carefully onto the sandwich maker. It took about half an hour for the beads to melt, (just enough so they join together, you don't want them to bubble). I checked them continuously during this time, whilst the kids were playing outside. I then put them onto a table to cool. Once cooled (only a short time) they popped right off the alfoil and looked quite stunning in the sunlight!


 Now to attach the sticks. The coloured sticks were bought from a discount shop. I used a hot glue gun to do this.


And there we have it! I have since been turned into a frog, cow, cat, and lion!


,


Monday, August 26, 2013

Marble Painting


Following a long stint outside, jumping on the trampoline, digging in the garden, and chasing chickens it was time for little sister to go to bed and some one on one creative time with Mum.

I found a tray that fit A3 sized paper, a paint shirt,  marbles and acrylic paint and did a short demonstration, and let the little guy go for it. He hasn't been too phased with painting or creating of late, so I hoped this would grab his attention... the marbles, the movement, the paint, the lines, will it capture his interest?


He loved it! Marble painting was a wonderful, quick, creative experience. It was perfect for a three and a half year olds attention span. 


The paintings look quite lovely on his wall and we will definitely be doing marble painting again!

Sunday, July 28, 2013

Quick make Fingerpaint!


Reasons to do finger painting with your kids: It's fun, it allows your child to express themselves, stimulates creativity and imagination, develops fine motor, encourages language around the process of creating designs, experimenting with colour and texture, allows your child the freedom to be messy!


 Ingredients:
1 cup Flour 
water
detergent
food colouring

Make a paste with a little water and flour and slowly add water and detergent (only a drop or two) to make the desired consistency. I made this one quite runny. Separate into paint pots and add food colouring.


Prepare Space: I like to use an old shower curtain. You can use it with any medium (clay, glue, paint) and it washes off easy. Paint shirts are good, but old clothes are essential! Large sheets of paper. 
The Art shed is fantastic for cheap quality art supplies

We get our paper from the art shed at west end 
http://www.artshedbrisbane.com.au/

They started with paint brushes on paper


Didn't take long until it became body painting!

I love watching them share materials and enjoying working both together and independently


Lovely sensory experience. My eldest enjoyed describing the colours merging and changing. While the little one enjoyed painting her legs, arms and face :) It got quite funny at the end because they had painted their feet and hands and it got very slippery! So beware! We all thought it was hilarious, slipping and sliding in the paint...it wasn't long before they both ended up in the shower!

Sunday, July 21, 2013

Painting in the bath gone wild!


Finding painting experiences that suit two different age groups can be tricky. As both my kids are very tactile learners (particularly my 3.5 year old who still puts everything in his mouth) sometimes painting can end up being a bit of a nightmare. Paint rarely just stays on the paper or canvas. That got me to thinking about painting in the bath! I then found a great recipe on the amazing site http://www.artfulparent.com/.

The Bath paint recipe:

1/2 a cup of cornflour
1/2 a cup of water
shampoo
food colouring

First, I made a paste with the cornflour, boiled it up in a saucepan, stirring constantly until it's a smooth paste.
I then added some shampoo until it was the consistency that I preferred (not too runny and not too thick). I then separated the paste into a palette with four different compartments and mixed in a little food colouring in each. Just a tiny drop is all you need. (I always put in too much) that resulted in blue children for a night (they were only slightly stained)! The bath and tiles washed off clean. 


Having fun painting each other and the side of the bath


Miss M went wild totally enthralled in the experience
The best thing of all, it's such an easy clean up, goes down the drain with the bath water!


Tuesday, July 16, 2013

Pot Plant Painting with little ones


"Children the world over have a right to a childhood filled with beauty, joy, adventure, and companionship. They will grow toward ecological literacy if the soil they are nurtured in is rich with experience, love, and good examples."


Alan Dyer, “A Sense of Adventure”


Gardening and painting with my two little peoples...


Is this going to a magical sensory experience full of exploration, discoveries and fun OR is this going to be a complete DISASTER. Where someone ends up in tears (often me)!!!??? Well, I'm going to give it a shot anyways.


I ventured out and bought a couple of cheap terracotta pots, one small and one large, to fit the plants we already had (they'd been given to the kids from their Grandparents). The kids already had a bond with the plants as they had spent time over the past couple of weeks watering them.


I set the little one up with her little pot, in the high chair with four acrylic paints to choose from. As she is only 18 months she had to be supported (she often likes to eat the paint and do some face painting). She had the larger pot and chunky brushes (best for little hands to manipulate). She used the paint brushes for sometime and then used her fingers.


As for the little guy he painting away happily using his favourite colours.


I let the pots dry for a day and then Mr J and I added some wooden shapes with the hot glue gun for a bit of texture. I coated them in a hard core lacquer so the paint won't wash away. I gave it another day for the lacquer to dry and it was planting time!


 We did end up in the bath on both the painting and planting experiences.  
 Was it worth the effort and resulting mess?


Mr J's Venus fly trap plant


Miss M's plant


Of course it was!

How lovely it is to look outside and see their plants growing in their hand painted pots. 

I think more will be popping up around our house in the near future.